Finally got my drawings scanned, got two to show you, the first is of a lady we found on the internet. Kind enough not to wear clothes as some ladies are wont to do on the internet.
And here we have something special, We both worked on an image in a colab with my friend David over at www.insaneamok.blogspot.com
Go and read the story! It really is smashing :D
_________________________________________________________________
Music: Bobby McFerrin & Jorane - Montreal Jazz Festival
Sunday, January 30, 2011
Studies and...Buddies? pt.2
Lo again.
Wasn't quite finished with studying for the day so I have a whole bag of goodies to show to those who may be interested (Not you Steve.)
Started a study in how to do lighting and shifts in a day / night scene.
Things I learnt this lesson were thus
Part 1 (daytime):
•Use a Daylight system to illuminate scenes set in the daytime.
•Set up illumination based on the scene’s geographic location, orientation, and time of day.
•Use the Sky Portal object to gather skylight and apply it to the interior of buildings.
•Adjust scene exposure.
Part 2 (nighttime):
•Place photometric lights in a scene and adjust light color.
•Set shadow parameters so lights cast shadows properly.
•Change the exposure for a nighttime scene.
•Use a bitmap image as the scene background and adjust its output to compensate for night lighting conditions.
And there ya have it :D the following are just the images from 9:00am, 14:00, and 17:00 respectively.
The night works are renders of the Wip while I was adding in and working on details.
And for nighttime
_____________________________________________
Music - Celldweller Own little world - we will never die remix
Friday, January 28, 2011
Studies and...Buddies?
Ho there!
Been busy studying today! Learnt something about normal bump mapping in a Cage method.
Things I learnt from this lesson were:
•Use Render To Texture to create a normal bump map.
•Use the Projection modifier to “steal” detail from a high-resolution mesh.
•Use the Normal Bump map type to render the effects of a normal bump map.
And for those who aren't so techno-involved, A bump map (as google so kindly puts it) is thus:
•Bump mapping is a computer graphics technique where at each pixel, a perturbation to the surface normal of the object being rendered is looked up in a texture map and applied before the illumination calculation is done (see, for instance, Phong shading)
aaanyway.
The first image is just the spread of the bump, the materials I was given to work with. it's just the unwrapped diffuse of a high-res model.
And the next image is the wrapped version of the diffuse bitmap of the warriors face in action. With no bump mapping included
And finally, here is the head with bump mapping included, when you compare the two heads it is a fairly obvious improvement.
As the little piece of paper here says:
'This tutorial showed you how to use a projection cage to receive texture from a high-resolution model, then apply the result to a low-resolution version of the same model. This technique is an effective way to assign complex surface detail to low-polygon objects. This can be a useful technique when you prepare a model for a game engine. It can help improve render time, as well. '
Well. There ya have it :D
-Francis
__________________________________________________________________________________
Music - Apocalyptica - On the Rooftop with Quasimodo
Thursday, January 27, 2011
Normal Bump Mapping
Been busy busy like a bee today with studying, completed a study in Normal Bump Mapping.
Apparently what I did yesterday was known as Regular Bump Mapping. After some digging about I managed to find the explanation of why the two are difference in a bit of text I skipped over in my morning haze. (Too much work and not nearly enough caffeine) They explain it as follows:
"Normal bump mapping is a technique that lets you simulate high resolution surface detail on low resolution polygonal models.
Normal bump mapping is similar in some respects to regular bump mapping, but it conveys more complex surface detail. Normal bump maps store not only the depth information used in regular bump mapping, but also information on the direction normal of the surface, to produce more life-like results. "
So in general this task was to do the following:
Normal bump mapping involves two objects: a high resolution, polygonally detailed object as the source for the normal bump map information, and a low resolution target to receive the map and use it to appear more finely detailed than it really is.
And what I learnt in this task was the following:
•How to set up the map projection using the render to texture controls.
•Define diffuse, normal bump, and height maps, and bake the resulting texture onto a destination object.
•Preview the baked result in a viewport.
The first image is the information from the diffuse map only. The height and bump maps have been put in to the texture (They call it baked) of the plane but are not visible at this time.
The second image is the completed render, simple yet convincing.
And the final image is just a render of what they gave me to work with and as you can see how mapping works, taking something huge and in depth and simplifying it down and tricking the eye.
In other news, working on some sketches that i'll post soon enough
-Francis
_________________________________________________
Music: Apocalyptica - Path
Tuesday, January 25, 2011
Army Compound Bump Mapping
Howdy
Today I started on Bump Mapping.
From the information and instructions they gave me the goal of the assignment was:
•Applying a basic material to change an object’s color or shininess (the oil tanks and the fence piping)
•Applying a 3D procedural map to create a patterned material (the generators and the sentry bar)
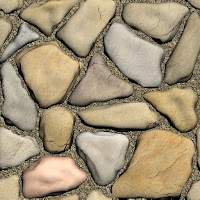
•Applying a Diffuse or “texture” map to give an object a photorealistic pattern (the ammunition canister, the terrain, and almost all of the building surfaces)
•Using the UVW Map modifier to control the projection, orientation, and scale of texture mapping
We also showed how to copy UVW Map from one object to another when the objects share the same material.
•Using bump mapping to give a 3D appearance to a textured material (most of the materials on the buildings)
•Using opacity mapping to make a material partially transparent (the chain-link fence)
•Using the object-space Mapscaler modifier to project a map onto a complicated shape (the roof of the house)
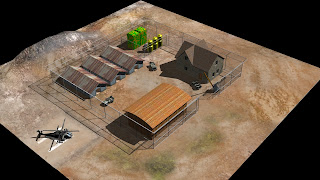
I think I did pretty well. Was a fun excercise, attached are the before and after pictures.
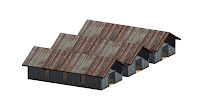
What they gave me to start off with and what I ended up producing:

Getting used to the program is coming along smoothly and I can't wait to start the actual course, almost finished the bunch of tutorials they gave me.
See ya later
-Francis
___________________________________________________
Music: Two Steps from Hell - Black Blade
Today I started on Bump Mapping.
From the information and instructions they gave me the goal of the assignment was:
•Applying a basic material to change an object’s color or shininess (the oil tanks and the fence piping)
•Applying a 3D procedural map to create a patterned material (the generators and the sentry bar)
•Applying a Diffuse or “texture” map to give an object a photorealistic pattern (the ammunition canister, the terrain, and almost all of the building surfaces)
•Using the UVW Map modifier to control the projection, orientation, and scale of texture mapping
We also showed how to copy UVW Map from one object to another when the objects share the same material.
•Using bump mapping to give a 3D appearance to a textured material (most of the materials on the buildings)
•Using opacity mapping to make a material partially transparent (the chain-link fence)
•Using the object-space Mapscaler modifier to project a map onto a complicated shape (the roof of the house)
I think I did pretty well. Was a fun excercise, attached are the before and after pictures.
What they gave me to start off with and what I ended up producing:

Getting used to the program is coming along smoothly and I can't wait to start the actual course, almost finished the bunch of tutorials they gave me.
See ya later
-Francis
___________________________________________________
Music: Two Steps from Hell - Black Blade
Monday, January 24, 2011
More Animation
Well, Started on bipedal motion today! (on 2 hours worth of sleep) A fun task but quite a mouthful to handle :D
The two videos that I uploaded are basic walking motion with some added sway to the hips and some bouncing of the knees to add a more natural feel as well as some arm motion. All in all, it was great fun and an educational experience.
Trying to get a headstart before I start the course on February 7th. Also got a few sketches coming up, and doing some sketches for my friend David's stories over at Insane Amok
See ya tomorrow
________
Music: Celldweller -Tainted
Sunday, January 23, 2011
Friday, January 21, 2011
Helmets and Girlfriends
Got some pictures for you!
Been trying my hand at 3d, and while I've only just started, I figured you might want to see this viking helmet.
And as a special bonus, a picture of my lovely girlfriend, Meg.
Wednesday, January 5, 2011
A 'Steamy' Update
So....
Things are going to be a little rough with me of late, been battling to get everything up and going with the entire blogging thing. With the exclusion of much of my previous work I'm afraid I don't have much to show and I won't have much to show for a few weeks yet. You see I'm moving from Durban (South Africa) To Johannesburg. (same country just 9 hours drive).
Busy organizing my affairs and putting everything in order proves to be quite challenging as well as scary.
In the end, it's my one and only shot to follow my dreams and become a 3d designer and animator, it's the one and only shot that I have. It's either this or study another course that I hate for 3 years, finish it, find a job (That I hate), drive a car (That I hate), to the same workplace with the same people (That I hate) and go home to a house (That I hate) and most probably to a family (That at that point i'd hate as well).
It's not easy, full time student during the day time and waitering / odd jobs to pay rent at night.
In other news, I bought myself a spiffy A5 sketchpad :D So I can sketch around and draw easier, just because it's small doesn't mean it can't be good.
Now that I've fascinated you with a thrilling life story i'll take me leave. But first, a screenshot of 3ds max and the fabled teapot. Starting to learn my way around the program before the course. Seems only logical that if I have the time beforehand and the tools at my disposal. I might as well learn to use it.
Tuesday, January 4, 2011
Oodles and Doodles pt. 2
I've decided not to post many more of my previous pencil images for fear of my safety of my 2 viewers. (Myself included) Other than that, here are works in progress that I cannot finish anymore due to the fact that my tablet broke and I would quite like to purchase a Wacom Intuos 4, but that costs about R5000 here, so i'm stuck waiting a bit, but here are semi-started doodles and noodles. Can't remember the inspiration or the cause of any of the images. Just the burning desire to improve my ability.
Oodles and Doodles
Well, here are the first of the bits and bobs of what I do. I'm by no means the greatest artist, but I at least have the determination to become better than I am now. Admittedly in a fit of rage at my current inability to draw to the standards that I want I haven't draw in about 2 weeks, so these are all old images.
Secondly. You may notice that here and there in my works are mimics (copies) of professional work such as Loomis or Boris Vallejo. When I'm out of inspiration I like to try and copy the 'masters' to see how far I can get and what I can learn from them and I also like the styles so hoping with constant mimic and mashing that I could be able to develop my own unique style. (I have high hopes)
Secondly. You may notice that here and there in my works are mimics (copies) of professional work such as Loomis or Boris Vallejo. When I'm out of inspiration I like to try and copy the 'masters' to see how far I can get and what I can learn from them and I also like the styles so hoping with constant mimic and mashing that I could be able to develop my own unique style. (I have high hopes)
A new beginning
Well, hello there.
My name is Francis, I'm an aspiring artist and soon-to-be 3D design student.
This is my blog where I will be posting various art pieces and sketches along with my 3D work for all to see.
On a side note, if you dislike dark-humor and frequent self-hating comments, this very well may not be the Blog for you. But I hope you do enjoy the stay and feel free to comment.
Regards
Francis
Subscribe to:
Posts (Atom)


